
.png)
WhatsApp Integration
Connect official WhatsApp to Gincore to communicate with customers directly from the system. All chat history will be saved in Gincore, and your staff will be able to reply to messages via a single-window interface. Integration through Meta guarantees stable performance without the risk of number blocking. Follow the step-by-step guide below to set up the connection.
Prerequisites
- A Facebook account or managed Meta account.
- Registration as a developer.
If you are not registered yet, visit the developer registration page and follow the instructions. - A WhatsApp-enabled device to send and receive test messages.
1. Creating a New Meta App with WhatsApp
- Open the Meta App Dashboard to create a new app.
- Click Create App.
- Enter your app name and your contact email address.
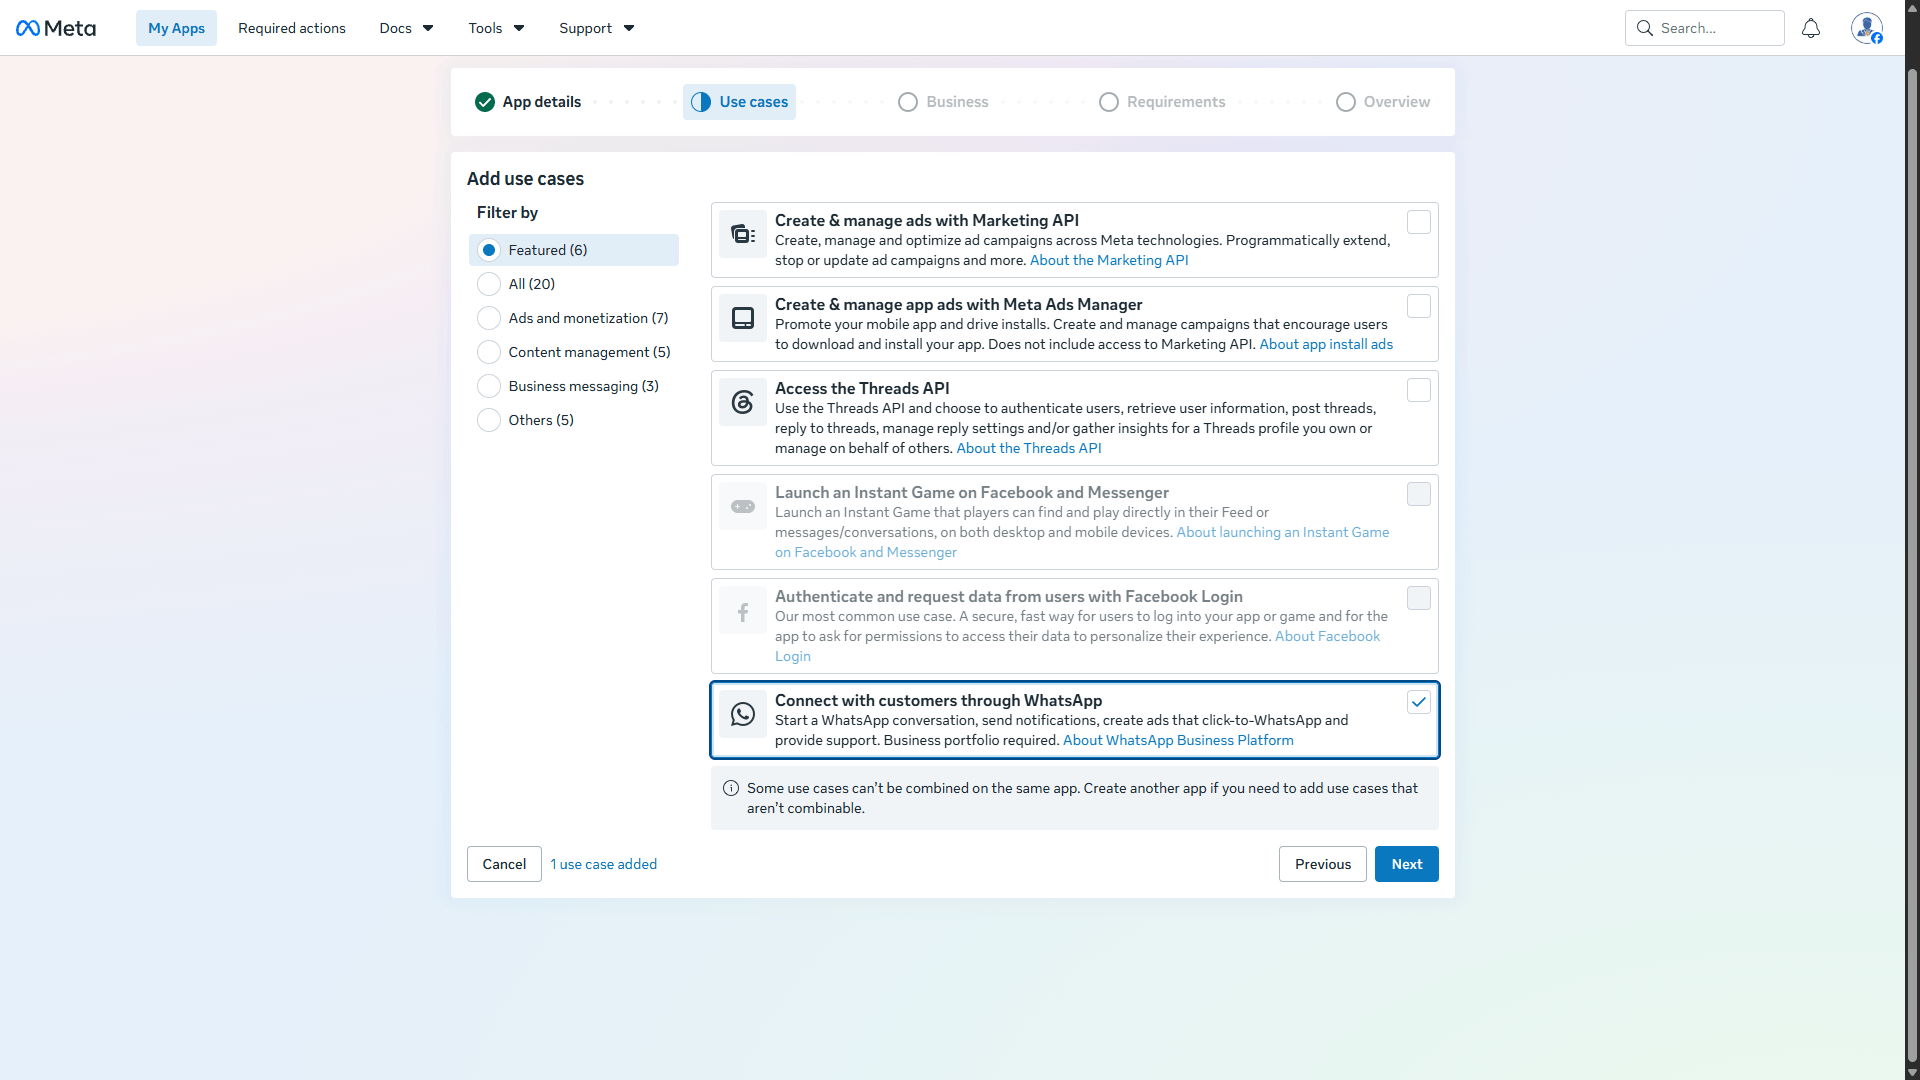
- Select the Connect with customers through WhatsApp use case and click Next.
- Select an existing business portfolio or create a new one.
- A list of publication requirements will appear on the screen. You may not have any requirements at this stage. Click Next.
- Confirm your details, use case, and business portfolio. Click Previous to make changes, or Create app to finish creating the app.
2. Configuring the Use Case
Set up the use case parameters and access rights.
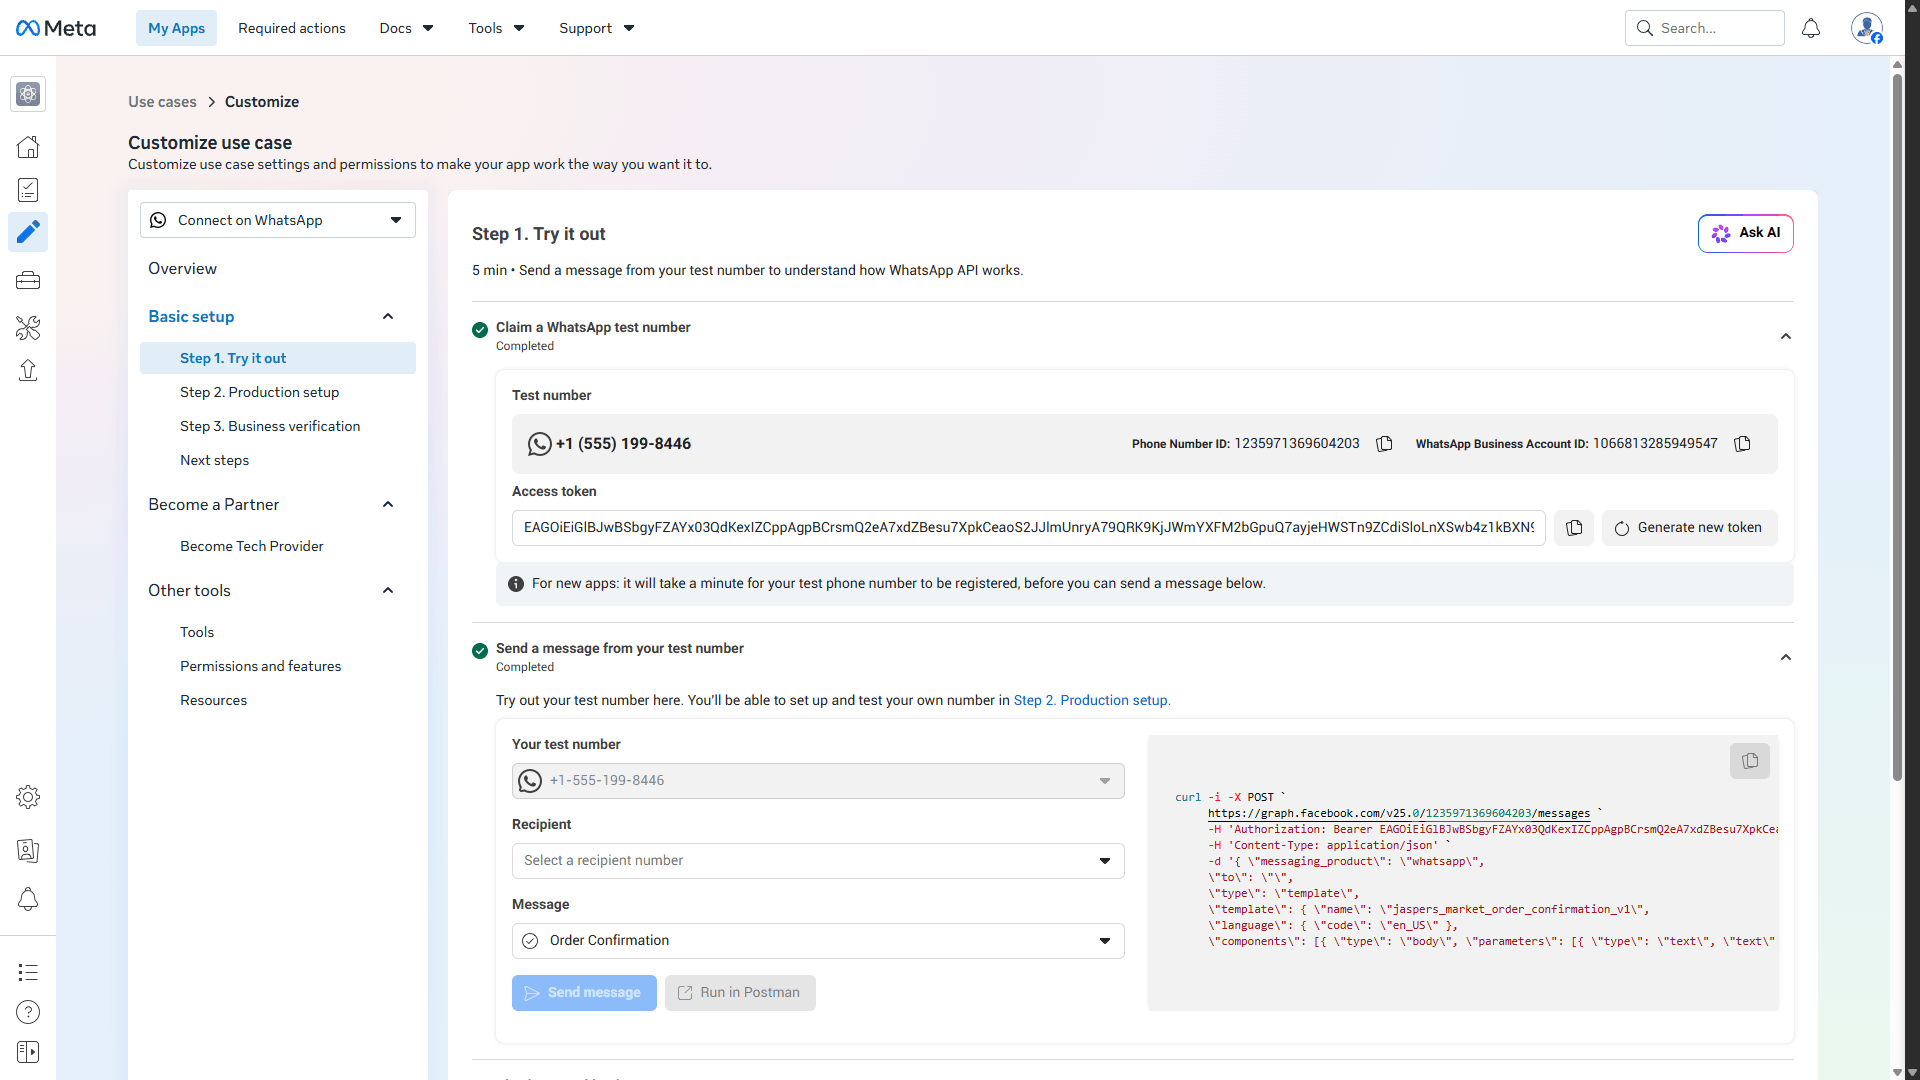
Stage 1. Testing (Try it out)
Send a message from your test number to understand how the WhatsApp API works:
- Click Generate token to create a temporary access token for sending a test message.
- Select the sender's test phone number from the drop-down menu.
- In the Recipient field, add the phone number to which the test message will be sent.
- Click the Send message button to send your first message.
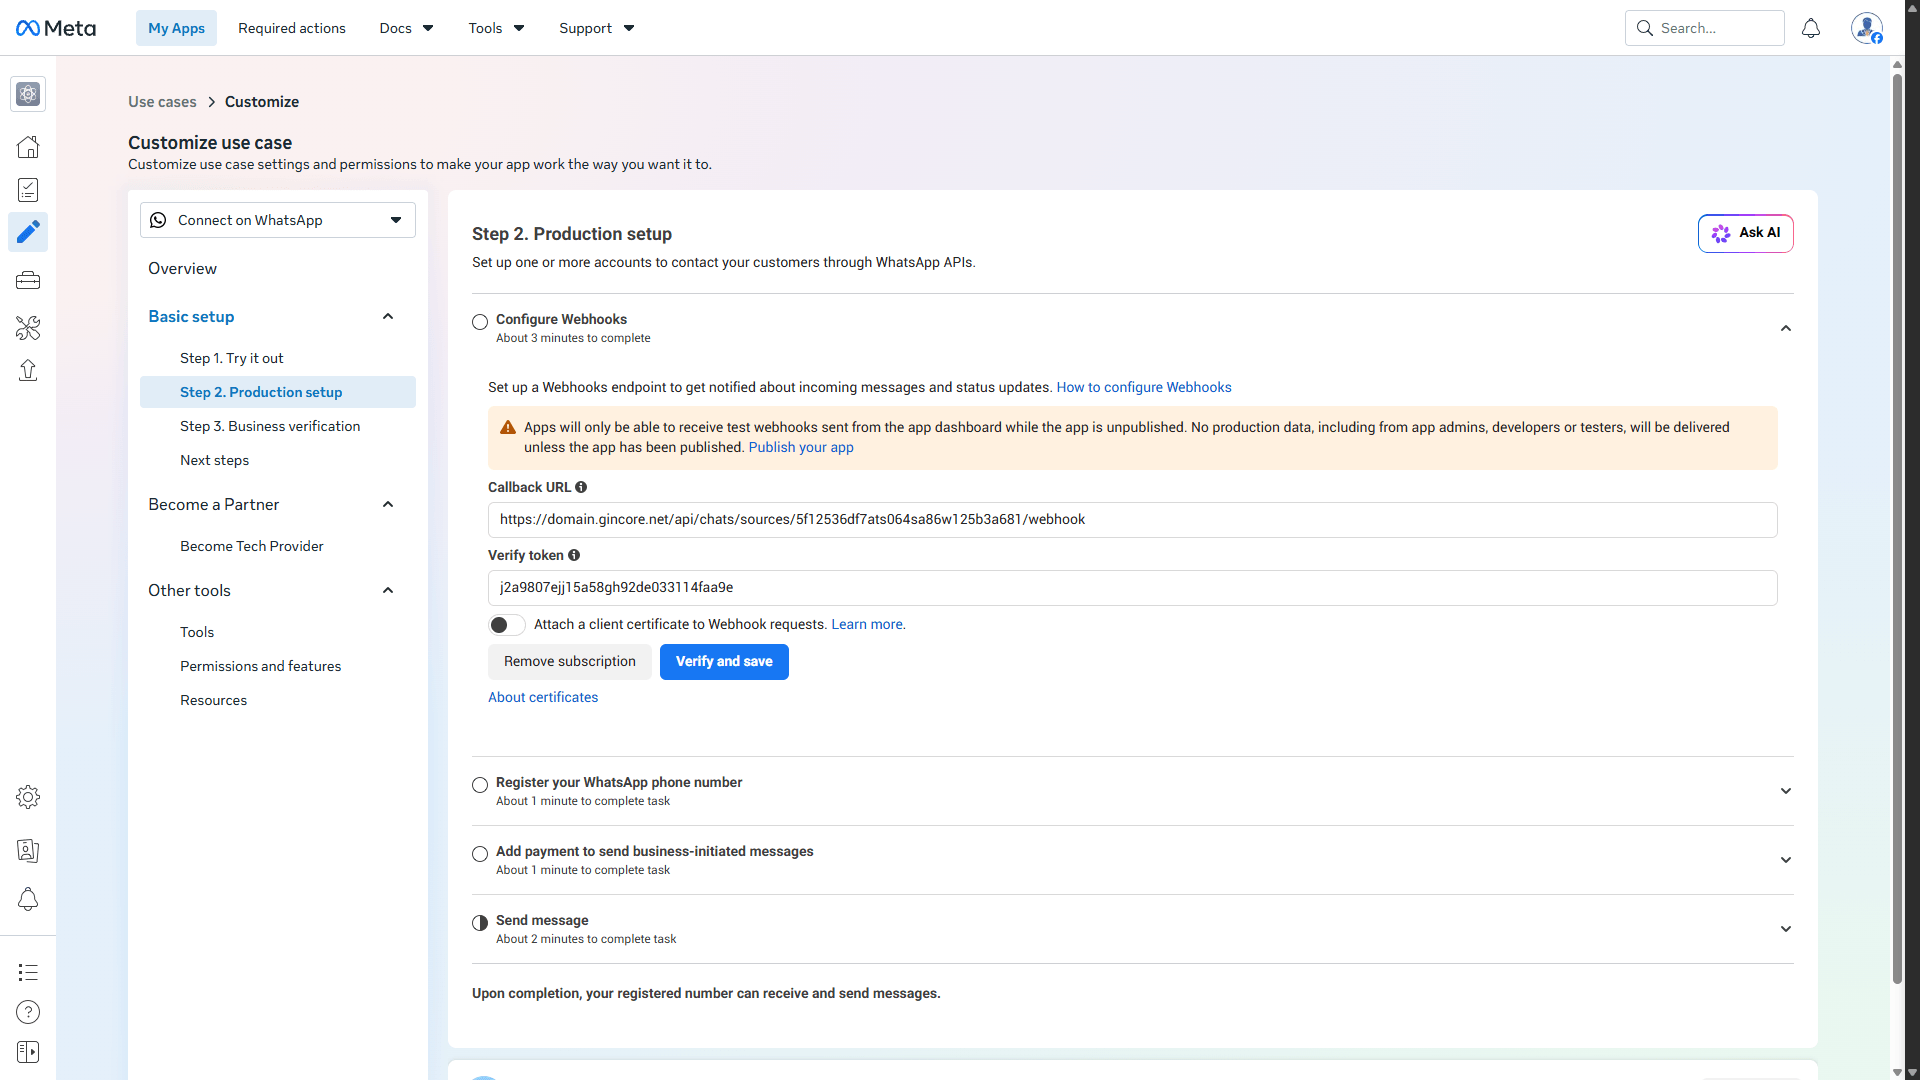
Stage 2. Production setup
Create one or more accounts to communicate with customers via the WhatsApp API:
- We will skip the Configure Webhooks section for now (Webhook setup is detailed in Step 5).
- In the Register your WhatsApp phone number section, click the Add new number button and follow the instructions to add and verify your WhatsApp Business number.
- Important: Once connected, the settings panel will display your WhatsApp Business Phone Number ID. Copy and save it for use in later stages.
- In the Add payment to send business-initiated messages section, link a payment method for sending business-initiated messages. Go to the Billing Hub, click Add payment method, and follow the instructions.
- To send messages via the API, you need to create a permanent access token (details in Step 3).
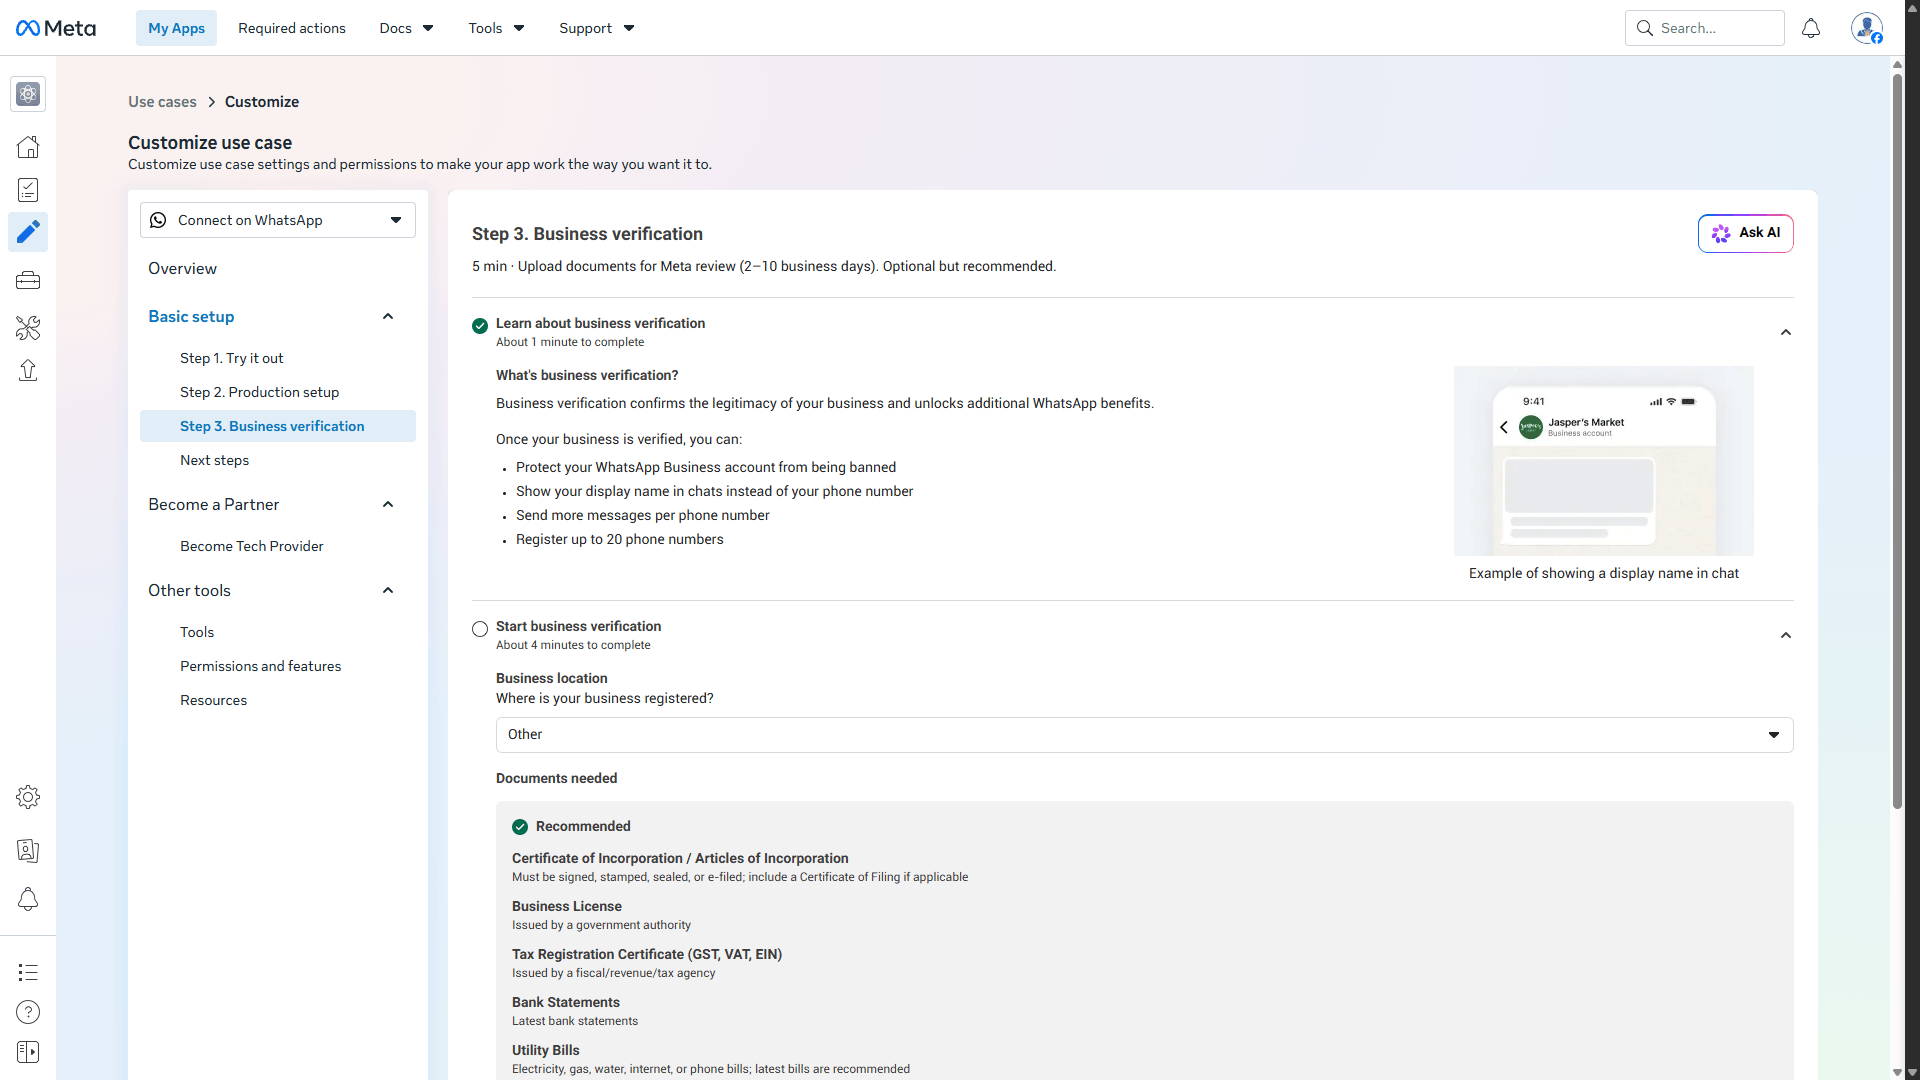
Stage 3. Business verification
Upload documents for Meta review:
- Learn what business verification entails (confirming company registration for legitimacy) and what additional WhatsApp benefits it unlocks.
- Click the Start verification button and complete the business verification process by following the on-screen instructions.
3. Creating a System User and Generating a Permanent Token
You need to create a permanent token for use across the entire WhatsApp Business platform.
- Go to the Business Settings section and click System users on the sidebar.
- Click the +Add button in the top right corner and follow the instructions to create a new system user.
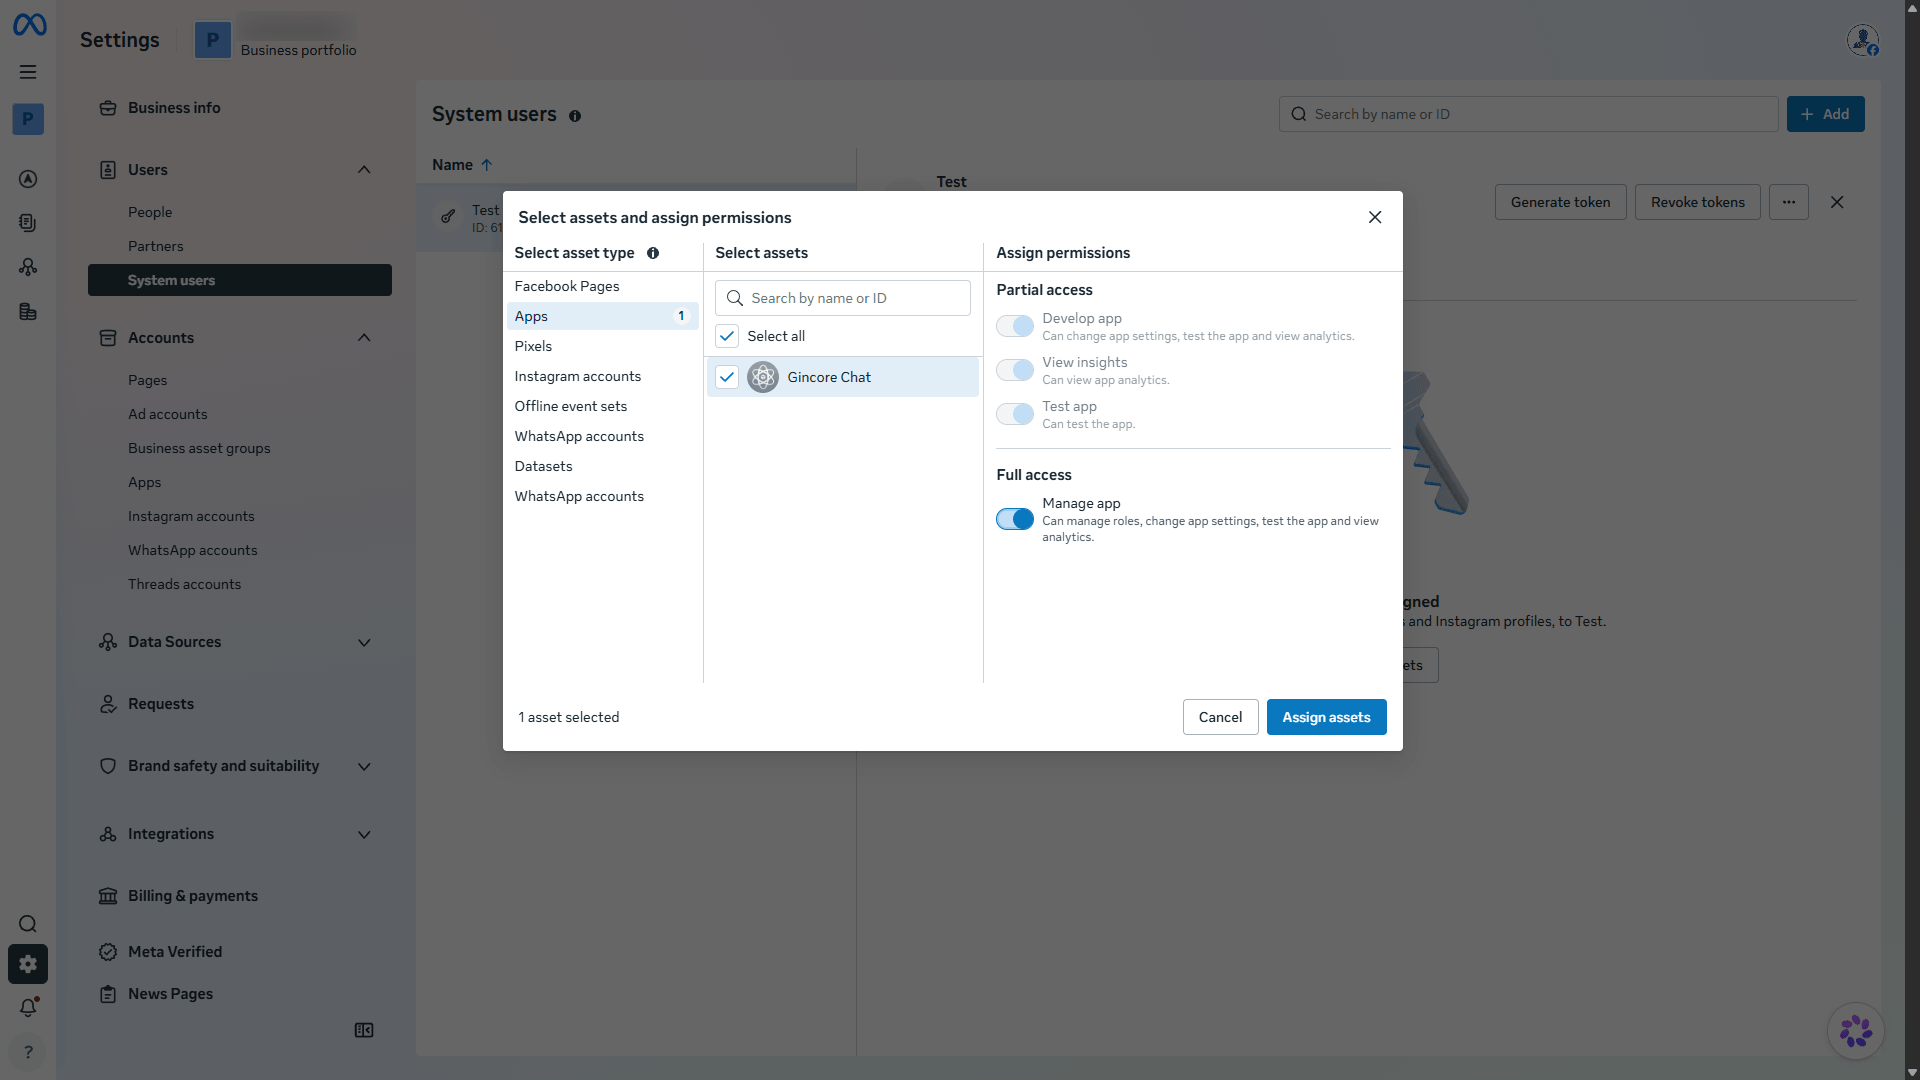
- Select the created user and click Assign Assets.
- Under Apps, select your app and toggle on Manage app (under Full control).
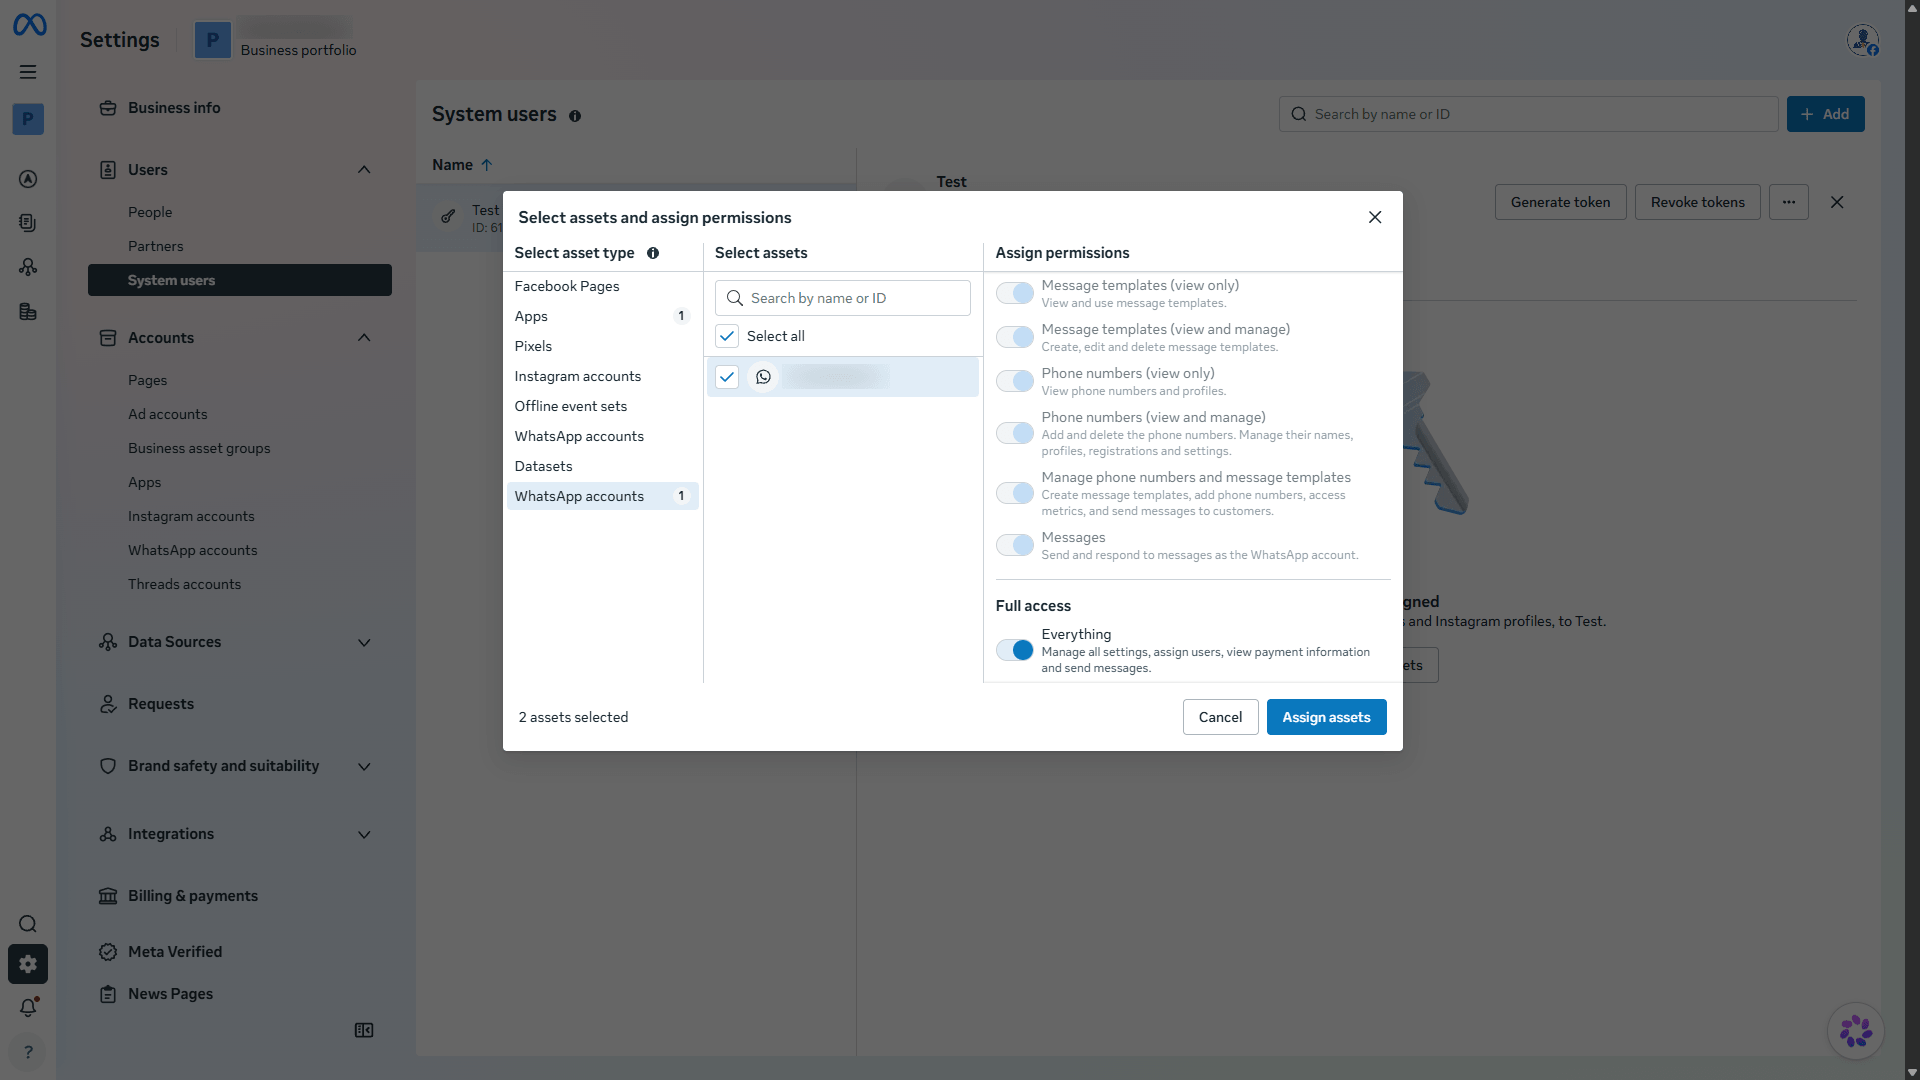
- Under WhatsApp account, select your WhatsApp account and toggle on Everything (under Full control).
- Click the Assign assets button.
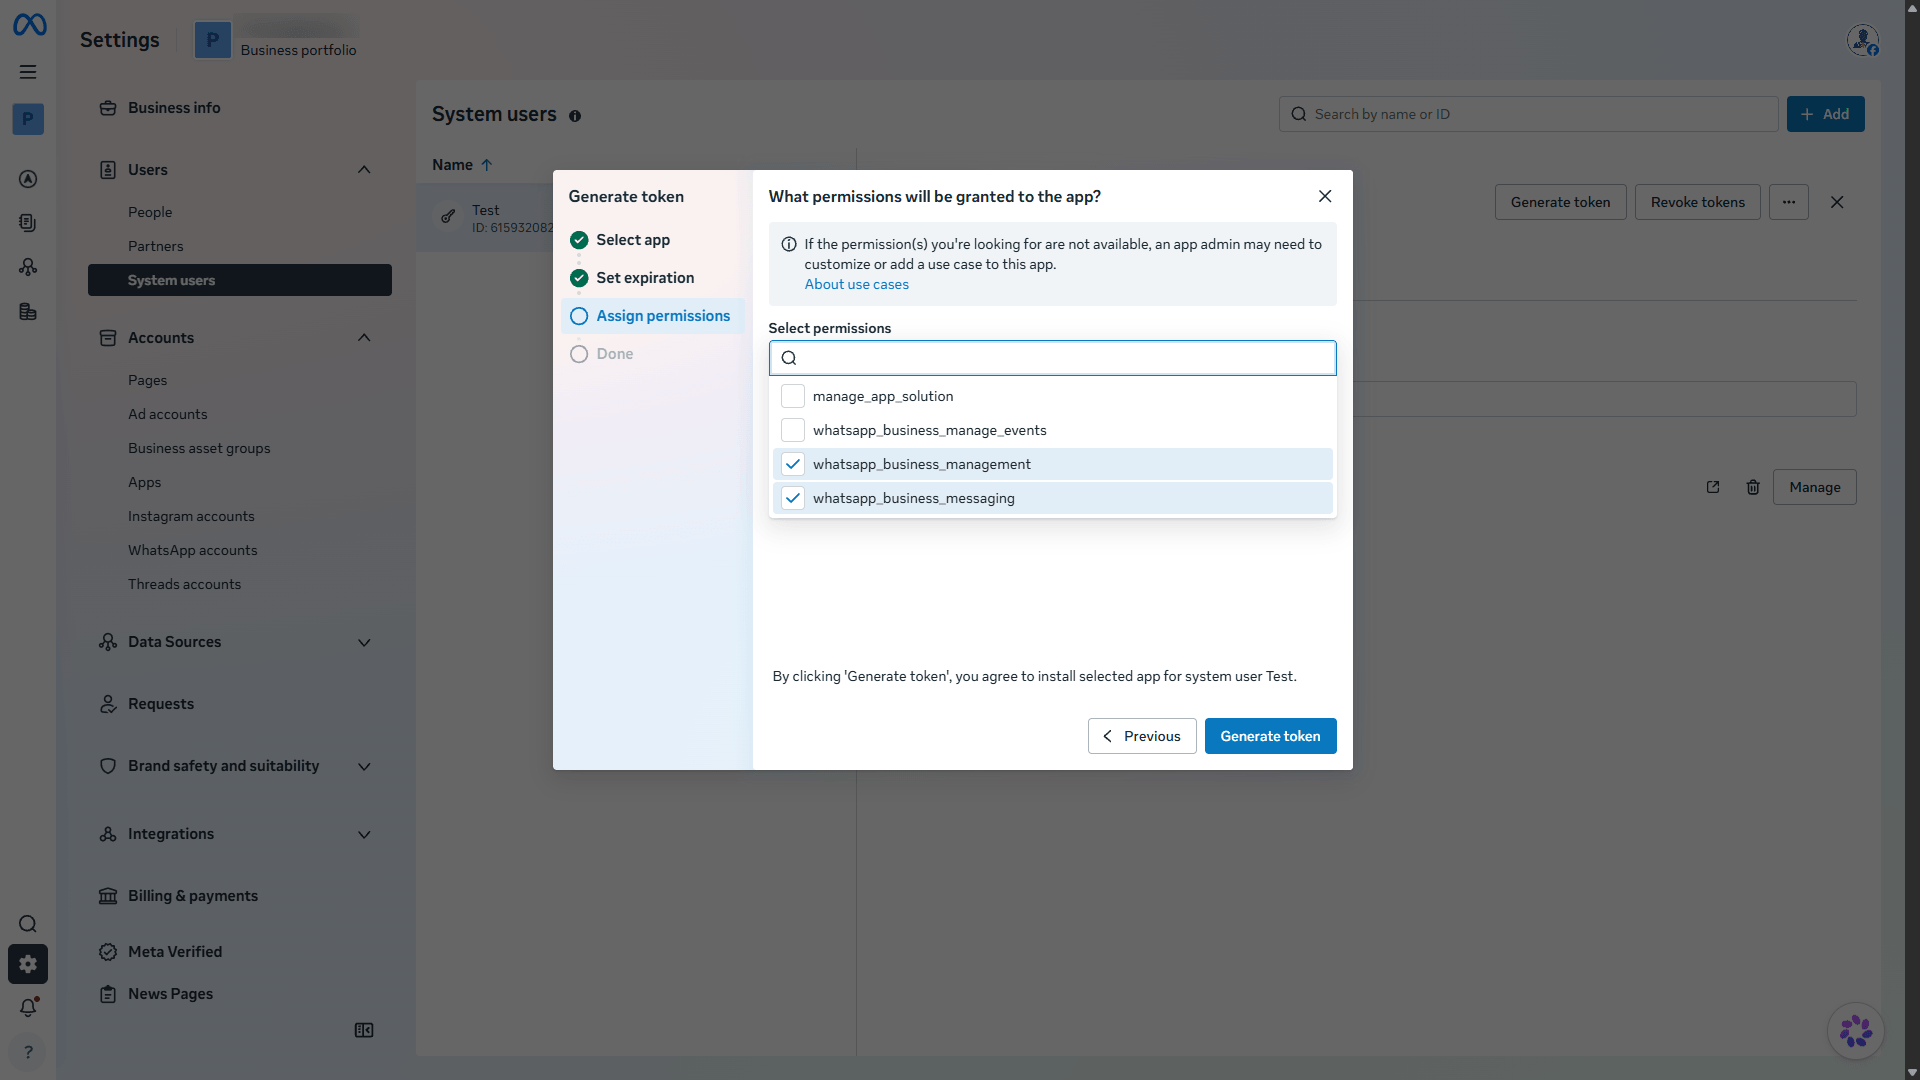
- Click Generate token.
- Follow the instructions to generate the token.
- Make sure to add the following permissions to the token (Assign permissions):
- whatsapp_business_messaging
- whatsapp_business_management
- Copy the generated token and store it securely.
4. Gincore Configuration
- Open your app in Meta, go to App settings > Basic. Copy the App secret value and save it.
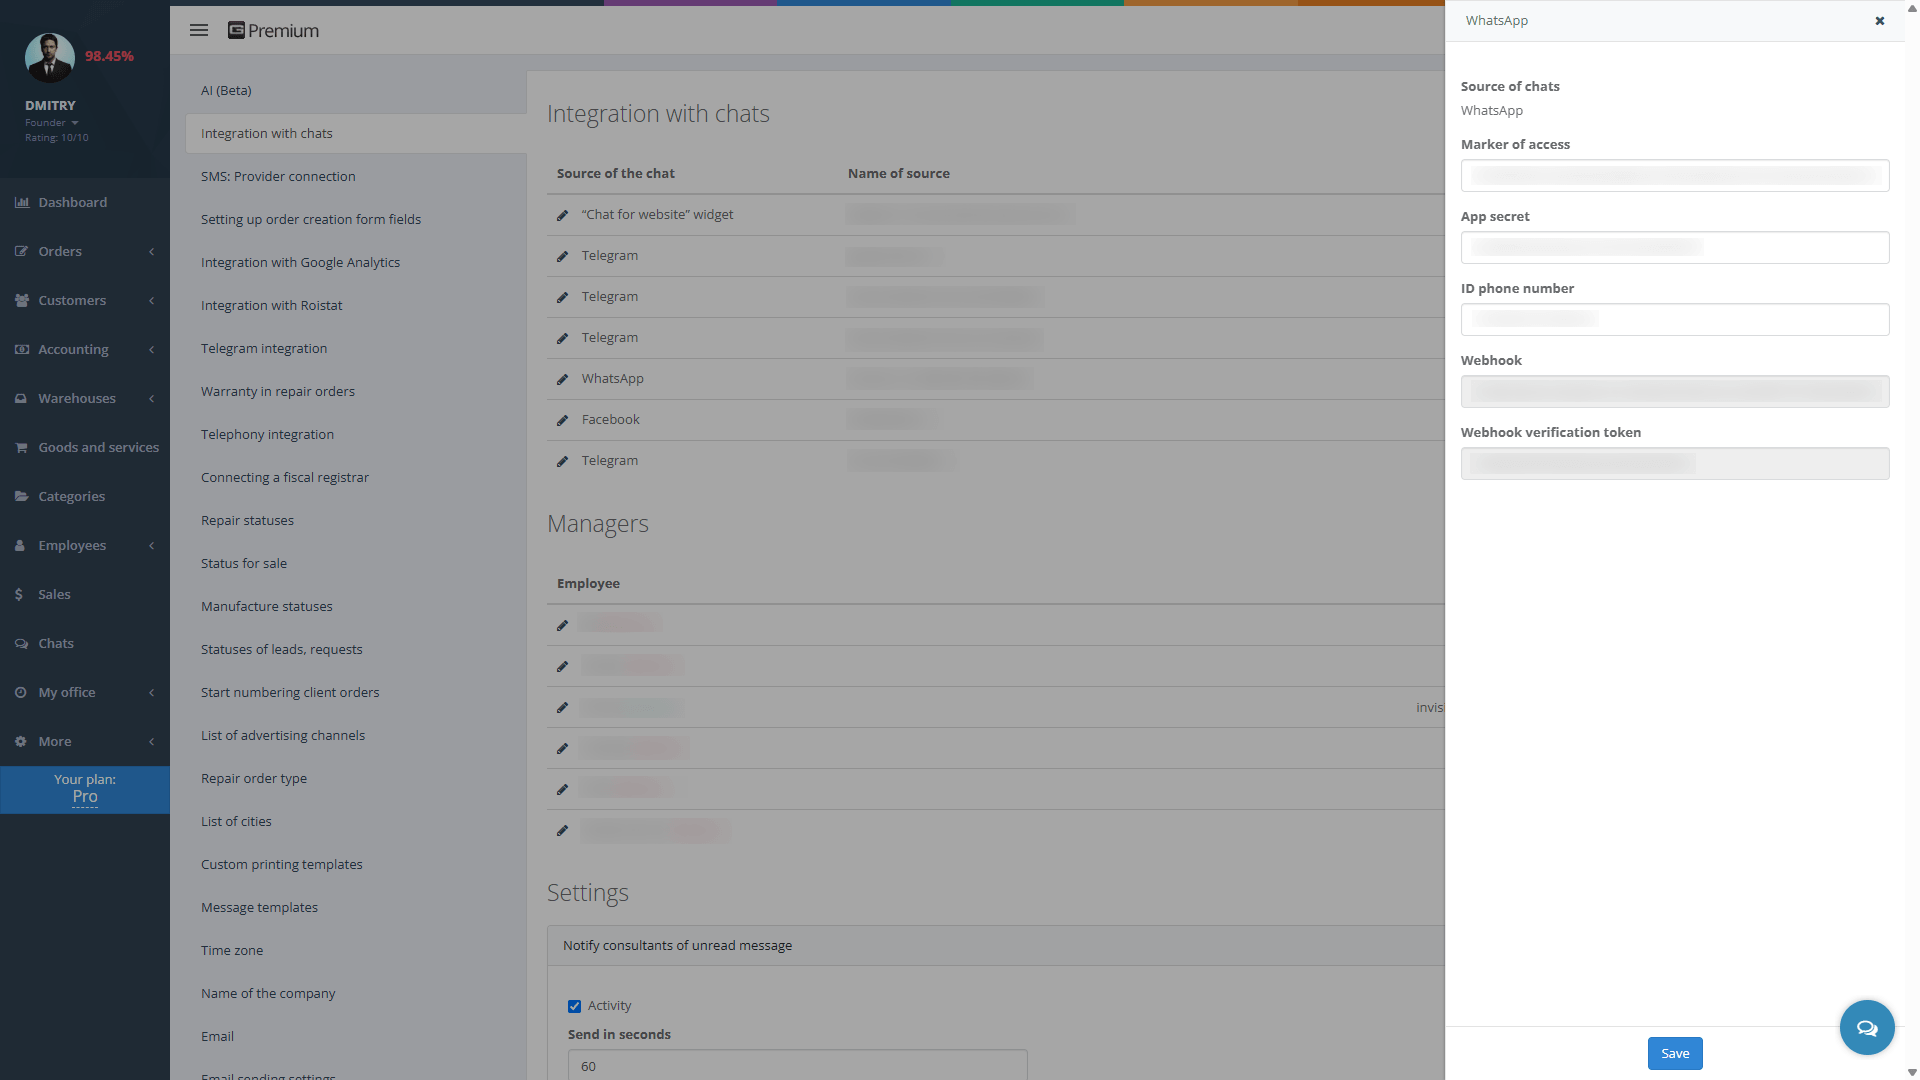
- In the Gincore system, navigate to the menu: More > Settings > Integration with chats.
- In the “Integration with chats” block, click the +Add button.
- Choose WhatsApp as the “Source of chats” and enter the previously saved data:
- Marker of access — the permanent user token (from Step 3).
- App secret — the App secret (from step 4.1).
- ID phone number — the WhatsApp Business number ID (from Step 2, Stage 2).
- After saving, the Gincore settings window will display the Webhook (URL) and Webhook verification token. Make sure to copy and save them.
5. Configuring Webhooks in Meta
Let's go back to the Meta app dashboard to complete the Webhooks configuration we skipped earlier.
- Open the Use cases > Connect with customers through WhatsApp > Customize page and proceed to Step 2. Production setup.
- Under Configure Webhooks, enter the details copied from Gincore and click the Verify and save button:
- Callback URL — paste the Webhook (URL).
- Verify token — paste the Webhook verification token.
- After successful verification, you need to configure Field Webhooks (subscribe to specific fields). Make sure to select:
- user_preferences
- messages
6. Finalization and Publishing
- In the Publish section, publish your app. Ensure all requirements are met and use cases are added correctly.
- Be sure to add a link to your privacy policy. To do this, go to App settings > Basic and fill in the Privacy policy URL field. Also, fill in the remaining company contact information.
- Double-check the Connect with customers through WhatsApp use case settings and the app verification results (see Step 2).

Total
security
The data is transmitted in encrypted form and stored on servers with backup

Cloud access
24/7
Managing your business remotely from any part of the world 24 hours a day. 
Customer
support
Complimentary demonstration training on utilizing the accounting software.
Swift assistance via the built-in chat feature

Release
tracking
We are constantly improving Gincore. Track our latest major and minor releases
Start your free trial right now